Most new traders lose accounts through oversized positions, not bad strategies. Forex risk management starts by deciding in advance how much to lose, then calculating lot size: position size = (balance x risk %) / (stop loss in pips x pip value).
The popular 1% rule caps risk at $10 on a $1,000 account. Losses compound harshly, since a 50% drawdown needs a 100% gain to recover, and leverage magnifies sloppy sizing, as a 20-pip adverse move on five lots wipes out $1,000. Bonus accounts add pressure through lot-volume requirements, tempting traders to overtrade. The four-step method sets the risk amount, places the stop where the chart dictates, finds the pip value, and divides, rounding down to the broker’s lot step and checking margin.
Comparing 0.5%, 1%, 2%, and 5% risk after ten straight losses shows why beginners should stay at or below 1%. Worked examples cover EUR/USD, USD/JPY with its different pip value, and varying stop distances: wider stops mean smaller lots, not higher risk. Common mistakes include widening stops, doubling size after losses, stacking correlated pairs, and ignoring spread. A journal and a quick pre-trade checklist help build discipline.
Most new traders blow up an account because of position size, not because of a bad strategy. One oversized trade on a small balance can erase weeks of gains. That is especially true when you start with a bonus or a few hundred dollars, where every mistake costs a larger share of your capital.
Forex risk management and position sizing means deciding in advance how much you can lose on a trade, then calculating the lot size that keeps you inside that limit. The core formula is simple: position size = (account balance x risk %) / (stop loss in pips x pip value). Most traders follow the 1% rule, so on a $1,000 account you risk no more than $10 per trade.
Below, you will see how the formula works, how to pick a sensible risk percentage, and a worked example you can copy. We also point to calculators that do the math for you. At InstaForex Bonus, we help readers start live trading with bonus funds, and those funds only last if you size every trade with care.
Forex moves fast, and leverage makes it faster. A 1% price move can wipe out a big share of a small account. Risk management is the set of rules that keeps one bad trade from ending your trading career, and position sizing is the rule that does most of the work.
The math of losing works against you. A 50% loss needs a 100% gain just to get back to even, because you rebuild from a smaller balance. Recovery gets steeper with every extra percent you lose, as the table shows.
| Account loss | Gain needed to break even |
|---|---|
| 10% | 11.1% |
| 20% | 25% |
| 30% | 42.9% |
| 50% | 100% |
| 70% | 233% |
Notice how the curve bends upward after 20%. Keeping each loss small is far cheaper than trying to win back a deep drawdown, and a fixed risk per trade is how you do it.
Leverage lets you open trades much larger than your balance. With 1:500 leverage, a $1,000 account can technically control about 5 standard lots on EUR/USD. At that size one pip is worth $50, so a 20-pip move against you costs $1,000. That is the whole account gone on a single normal-looking swing.

Now compare that with a sized trade. Risking 1% of $1,000 means $10. With a 20-pip stop, the right position is 0.05 lots, where each pip is worth $0.50. The same 20-pip loss now costs $10, and you can take it on the chin and keep trading.
The market decides where price goes, but you decide how much a wrong guess costs.
Bonus accounts add pressure that many beginners underestimate. Offers like a no deposit bonus often come with lot-volume requirements before you can withdraw profits, and that pushes traders to open too many or too large positions. The bonus itself cannot be withdrawn, so its only value is the trading you do with it. If you size trades carelessly, a stop out can erase the bonus within days, and you have nothing to show for it.
Good forex risk management and position sizing comes down to one calculation you repeat before every trade. It uses four inputs, and you can find all of them in your trading platform in under a minute.
Work in this order. Place the stop where the chart says it belongs, then let that distance decide how big the trade is. Never pick the lot size first and squeeze a stop around it.
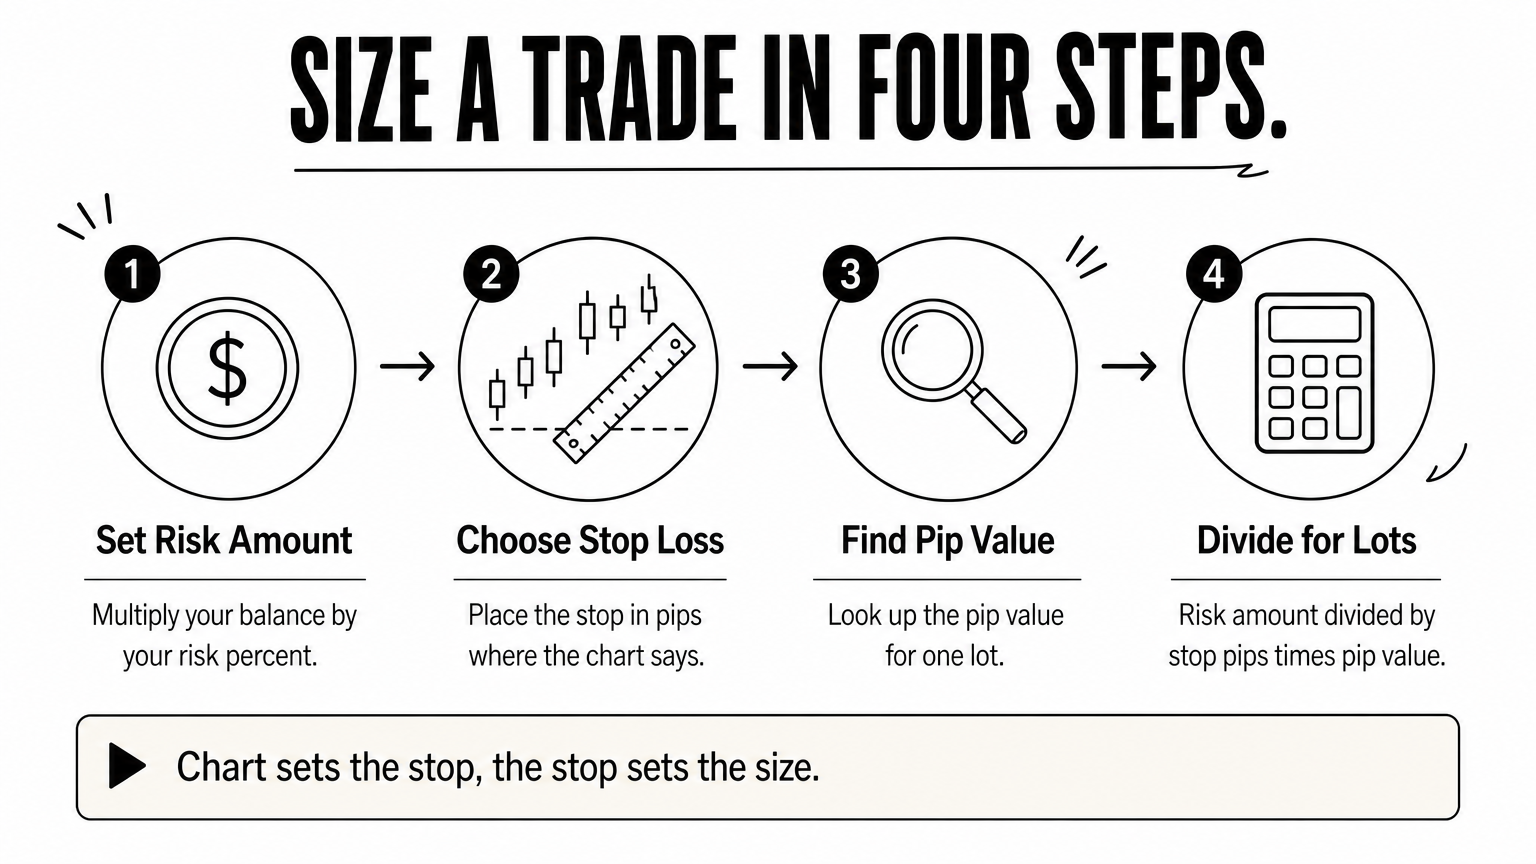
Here that gives $20 / (40 x $10) = 0.05 lots.
Let the chart set your stop, then let the stop set your size.
| Lot size | Units | Pip value (USD-quoted pairs like EUR/USD) |
|---|---|---|
| Standard (1.00) | 100,000 | $10 |
| Mini (0.10) | 10,000 | $1 |
| Micro (0.01) | 1,000 | $0.10 |
Finally, round down to your broker’s smallest lot step, usually 0.01. Rounding up quietly pushes your risk above your limit. Then confirm the required margin fits your balance. A free position size calculator can run these numbers for you, but learn the manual math first so you can spot a wrong input, such as the wrong pip value on a JPY pair.
The 1% rule says you never risk more than 1% of your account balance on a single trade. On $1,000 that is $10, and on $5,000 it is $50. The rule is popular because ten straight losses cost you only about 10%, a hole you can climb out of with an 11.1% gain.
A risk limit only counts if you keep it on the trade you feel most sure about.
New traders break the rule most often on “perfect” setups. Confidence is not a reason to double your size, because the market does not know how sure you are.
Some traders use 0.5%, 2% or even 5%. The table shows what each choice looks like after ten losses in a row on a $1,000 account.
| Risk per trade | Dollar risk | Balance after 10 losses | Drawdown |
|---|---|---|---|
| 0.5% | $5 | $951 | 4.9% |
| 1% | $10 | $904 | 9.6% |
| 2% | $20 | $817 | 18.3% |
| 5% | $50 | $599 | 40.1% |
The 2% rule suits traders with a proven strategy and some experience. Anything near 5% pushes you into the steep part of the recovery curve, so treat it as gambling, not planning.
Sound forex risk management and position sizing starts with one fixed percentage. Begin at 1% or lower, and drop to 0.5% while you test a new strategy. Move up to 2% only after you have logged at least 100 trades with results you trust. Then add a daily loss cap of about 3%, so a bad morning ends your session instead of your account.
Take a long trade on EUR/USD. You risk 1%, so your risk amount is $10. Support sits 25 pips below your entry, so that is your stop. One pip on a standard lot is worth $10.
Lots = $10 / (25 x $10) = 0.04 lots. Check it: 0.04 lots x 25 pips x $10 equals $10. If the stop hits, you lose exactly your limit and nothing more.
Yen pairs do not pay $10 per pip. At a rate of 150, one pip on a standard lot is 1,000 yen, or about $6.67. On a $3,000 account, 1% risk is $30. With a 50-pip stop, the math is $30 / (50 x $6.67), which gives 0.09 lots.
Using $10 here would have given 0.06 lots, a size that under-risks the trade by a third. The error can go the other way on other pairs, so always confirm the pip value before you trade.
Stop distance changes your size more than anything else. The table uses a $5,000 account on GBP/USD, risking 1% ($50) each time.
| Stop loss | Calculation | Position size |
|---|---|---|
| 25 pips | $50 / (25 x $10) | 0.20 lots |
| 50 pips | $50 / (50 x $10) | 0.10 lots |
| 100 pips | $50 / (100 x $10) | 0.05 lots |
Every row risks the same $50. A wider stop does not raise your risk, it lowers your lot size. That is the core of forex risk management and position sizing in practice.
Widen the stop, shrink the lots, and the dollar risk never moves.
Even traders who know the formula slip in predictable ways. Most errors in forex risk management and position sizing come from emotion and haste, not bad math. The fixes cost nothing.
Widening a stop after entry is the classic one. A $10 risk becomes $30 while your lot size stays the same. Set the stop before you click, and never move it farther away.

| Mistake | What it does | Fix |
|---|---|---|
| Doubling size after a loss | Turns one loss into a spiral | Keep risk fixed at 1% |
| Stacking correlated pairs | Long EUR/USD plus long GBP/USD is close to one 2% bet | Count correlated trades as one position |
| Oversizing to hit lot-volume targets | Burns a bonus faster | Spread volume across small trades |
| Ignoring spread and slippage | Real loss exceeds the plan | Add 1 to 2 pips to your stop math |
Revenge trading deserves its own warning. After a loss, your next trade should risk the same 1%, not 2% to win it back. Size should follow your rules, not your mood.
Your last trade has no say in the size of your next one.
Keeping a short journal makes these slips visible. Log the risk percent, stop distance and lot size for every trade, then review the log weekly for any entry above your limit. A three-line pre-trade checklist (stop placed, lots calculated, margin checked) takes thirty seconds and catches most errors before they cost you.
Forex risk management and position sizing comes down to one habit: decide your loss before you enter, then let the stop distance set your lot size. Risk 1% or less, round down to your broker’s lot step, and check your margin. The formula never changes. Only the inputs do.
Start small and keep it boring. Log every trade with its risk percent, stop and lot size, then review the log each week. Bonus funds make this habit more important, because a stop out erases the only value the bonus has. Run your next ten trades at 0.5% to 1% risk and watch how steady your results look.
If you want to practice with live conditions without funding the account yourself, explore InstaForex bonus offers and claim steps. Read the terms first, then size every trade the way you just learned.